Showing posts with label STW. Show all posts
Showing posts with label STW. Show all posts
Sunday, March 31, 2013
Remington 700 SPS - 7mm STW - Part 4
For those without either a long memory or are new to the blog, the launch of Nosler's new Long Range Accubonds this summer got me into a 7STW project to put them to the test.
If you're curious about the test bed.. here's the link to that part of the series:
http://guntinker.blogspot.com/2012/11/remington-700-sps-7mm-stw-part-2.html
Loads were H1000, 160g Accubond, F215M at 3.6" COAL. The groups were shot at 100 yards off a front and rear bag, sitting on a concrete shooting bench. The conditions were calm and slightly overcast. It was just a perfect day at the range.
Each group was shot with about 2 minutes between each round to keep the barrel cool. I did not remove the rifle from the bags or reposition the rifle between strings.
Powder Charge / Group Size (Measured center to center with a caliper) 74 gr - Adjusted after each shot to center on the paper
75 gr - 2"
76 gr - 1.3"
76.5 gr - 1.92"
77 gr - 1.6"
First impressions...
While I was braced to get my crowns knocked loose, the 7STW isn't very different from shooting a stout 7 Remington Magnum load. I'm not sure why I was expecting worse, while the powder charge is a bit higher, the velocity is only a few hundred fps over the RM with the same bullet weight.
Even with a nice long barrel, she is a bit loud. I'm sure I woke up the gentlemen next to me in the nearby lanes.
On a brand new barrel that hadn't been broken in and still using the factory trigger, I'm confident I can get this rifle tuned down to sub-moa. If I can get my paws on some 162g AMAX I'll give them a shot. I'd be curious to see how it does with a match bullet. (Although to be fair, the Nosler Accubonds tend to shoot as well for me as match bullets.)
Now.. to find some 162g AMAX on the shelves somewhere and maybe give the 140g Accubonds a run as well.

Monday, November 26, 2012
Remington 700 SPS - 7mm STW - Part 3
Part 3 - Load Development
Let me start out by saying, I'm fairly new to reloading with only about two years under my belt. I'm by no means a master at the craft, but I can consistently turn out ammunition that is accurate enough to pull sub-moa out my rifles.
Please note - The data I use for development is taken from load manuals and any attempt to use the examples I provide is at your own risk. This is entirely intended to be a record of how I've found to do my load workup and what works for me.
Now that the disclaimer is out of the way...
First things first - Planning and the single question at the core of it all.. What do I want this load to do? Is it for punching paper? Dropping an Elk, assuming I can ever draw a tag in Arizona? In this case, it's to do some very basic testing to determine the baseline accuracy of the rifle with some existing bullets so I have something to compare against when I get to the new Long Range Accubonds this spring. I'd like to have data on at least two bullets, first with the 160g Accubonds, which have been extremely accurate in two other rifles, as well as the 162g Hornady A-max.
- Review the load data from Nosler #6
- Pick out powder, primer and brass
- Work out starting charge
- Determine seating depth (With hunting rifles, I usually start with a dummy round loaded to SAAMI max length and then check it in the action to make sure it cycles.)
In this case, brass was an easy choice, Remington isn't my favorite brand, but it was coming in at 1/2 the price of the Nosler, with most places sold out. 7 STW brass isn't exactly common.
I already had some Federal 215M primers on hand, so that was an easy choice.
Lastly, I went with the most accurate powder tested per the Nosler guide, H1000. At this point, maxing out velocity isn't as important as just finding out what is consistent. And since consistent is accurate, no reason to deviate from their recommendation.
Before I start at the bench, I document my load work up to avoid any confusion or do any accidental mix and match. (It took only one screw up at the bench and 20 rounds needing to be broken down to learn that lesson.)
Below is a picture of my load workup. You'll see that I also use masking tape, so I can lay out the charges on my loading block. That way, when I'm doing a progressive increase, I make sure I get the right load each time. (I also lay out the ammo box the same way.)

I was brave with this build, hoping that the scope alignment isn't too bad, and it won't take too many rounds to get a rough zero. My past experience with quality optics, quality rings and Remington 700 receivers has been pretty good. Usually only 3-6" off the mark after assembly without bore sighting. If I wasn't feeling so brave, I'd likely have run up another 6 or 9 rounds at 74g to get on paper.
This was pretty nice brass. I haven't been the biggest fan of Remington brass, but this was better than expected. There was only one piece that shouldn't have made it through their QA in the 100 round bag, as it had a folded over bit of flashing at the case mouth. The primer pockets were also very uniform, with the tool removing almost no material.
Recognizing I'm late to the party on this one, but I was really pleased with the first Redding seating die I've used. Nosler must have cranked out a great batch of bullets to help in this, but I can't fault the final results. 13 of the 15 rounds I prepped came out to 3.598, with the other two being 3.597 and 3.599. (And for the record, I don't pre-sort my bullets by length.. so this is just plucking them out of the box and seating them!) The only downside is that the dies don't fit in their original box with the Hornady L-N-L bushing attached.

Next: Part 4 - Range Results
Let me start out by saying, I'm fairly new to reloading with only about two years under my belt. I'm by no means a master at the craft, but I can consistently turn out ammunition that is accurate enough to pull sub-moa out my rifles.
Please note - The data I use for development is taken from load manuals and any attempt to use the examples I provide is at your own risk. This is entirely intended to be a record of how I've found to do my load workup and what works for me.
Now that the disclaimer is out of the way...
First things first - Planning and the single question at the core of it all.. What do I want this load to do? Is it for punching paper? Dropping an Elk, assuming I can ever draw a tag in Arizona? In this case, it's to do some very basic testing to determine the baseline accuracy of the rifle with some existing bullets so I have something to compare against when I get to the new Long Range Accubonds this spring. I'd like to have data on at least two bullets, first with the 160g Accubonds, which have been extremely accurate in two other rifles, as well as the 162g Hornady A-max.
- Review the load data from Nosler #6
- Pick out powder, primer and brass
- Work out starting charge
- Determine seating depth (With hunting rifles, I usually start with a dummy round loaded to SAAMI max length and then check it in the action to make sure it cycles.)
In this case, brass was an easy choice, Remington isn't my favorite brand, but it was coming in at 1/2 the price of the Nosler, with most places sold out. 7 STW brass isn't exactly common.
I already had some Federal 215M primers on hand, so that was an easy choice.
Lastly, I went with the most accurate powder tested per the Nosler guide, H1000. At this point, maxing out velocity isn't as important as just finding out what is consistent. And since consistent is accurate, no reason to deviate from their recommendation.
Before I start at the bench, I document my load work up to avoid any confusion or do any accidental mix and match. (It took only one screw up at the bench and 20 rounds needing to be broken down to learn that lesson.)
Below is a picture of my load workup. You'll see that I also use masking tape, so I can lay out the charges on my loading block. That way, when I'm doing a progressive increase, I make sure I get the right load each time. (I also lay out the ammo box the same way.)
I was brave with this build, hoping that the scope alignment isn't too bad, and it won't take too many rounds to get a rough zero. My past experience with quality optics, quality rings and Remington 700 receivers has been pretty good. Usually only 3-6" off the mark after assembly without bore sighting. If I wasn't feeling so brave, I'd likely have run up another 6 or 9 rounds at 74g to get on paper.
This was pretty nice brass. I haven't been the biggest fan of Remington brass, but this was better than expected. There was only one piece that shouldn't have made it through their QA in the 100 round bag, as it had a folded over bit of flashing at the case mouth. The primer pockets were also very uniform, with the tool removing almost no material.
Recognizing I'm late to the party on this one, but I was really pleased with the first Redding seating die I've used. Nosler must have cranked out a great batch of bullets to help in this, but I can't fault the final results. 13 of the 15 rounds I prepped came out to 3.598, with the other two being 3.597 and 3.599. (And for the record, I don't pre-sort my bullets by length.. so this is just plucking them out of the box and seating them!) The only downside is that the dies don't fit in their original box with the Hornady L-N-L bushing attached.
(15 small bits of happiness)
Next: Part 4 - Range Results
Wednesday, November 21, 2012
Remington 700 SPS - 7mm STW - Part 2
Part 2 – The build
A simple fact – It’s always a good day when the big brown
truck brings you parts and you get a call from your FFL saying your transfer has shown
up.
A few details to share after doing quick inspection on the
rifle:
- The barrel is a 26” tube, great for taking advantage of a large amount of slow powder.
- I was a bit disappointed to see some grunge/funk built up around one of the optic mounting screws. It looked like corrosion, but wiped off with some CLP easily. Odd to have that in a new in box rifle.
- Per an inquiry with Remington, the twist rate is 1:9. Perfect for stabilizing the longer new Accubonds when they are available.
- The X-Mark Pro trigger was not bad at all and much better than the last one I had on a new rifle. A few passes over my trigger gauge showed it to be just a hair under four pounds and very consistent. It broke cleanly enough, that I’m going to hold off replacing it with the Timney until I get some range time. I have to wonder if it was a random anomaly or if Remington is putting more effort in, now that a fair number of factory rifles are shipping with adjustable, decent triggers.
- Typical Remington fit and finish – or about what I’d expect from the Remington assembly line.
The stock I've selected is the B&C Medalist Alaskan. The action dropped into the stock, but did have a bit of a
tight fit when putting on the bottom metal.
Good enough for a first pass at the range, maybe a bit of cleanup later on
will be in order. The action was torqued in place at 50 inch pounds.
As a side note, I’ve left the pressure pads on the end of
the stock that put a little bit of upward pressure on the barrel. I can
always remove them, but I’ve had pretty good luck with accuracy on sporter
weight barrels leaving them in.
A past project, moving a free floated laminated stock to a B&C Alaskan, actually showed better groups with the pads.. even if it did cause a 5” upward shift in the POI at 100 yards.
A past project, moving a free floated laminated stock to a B&C Alaskan, actually showed better groups with the pads.. even if it did cause a 5” upward shift in the POI at 100 yards.
Just a few notes on mounting the Trjicon aimpoint.
One of the few things I've found helpful when mounting a scope, is to do a setup run before finally torquing down the bolts. I like to just loosely assemble the scope, base and rings to the rifle, to make sure everything lines up the way I want and that the eye relief is correct. (And this is where I was glad I had a spare set of medium height rings on hand, since the low version wasn't viable.)
I used 25 in-lb for the base screws and 20 in-lb for the rings. I did not Locktite them in, as I've not found issues with quality mounts ever having an issue coming loose. I do use a set of levels to make sure that the scope is level before tightening it all down.
Here's a shot of the optics mount, showing the limited clearance of the power adjustment with the Talley medium height rings.

The completed rifle - ready for the range:
Here's a shot of the optics mount, showing the limited clearance of the power adjustment with the Talley medium height rings.
The completed rifle - ready for the range:


Tuesday, November 20, 2012
Remington 700 SPS – 7mm STW - Part 1
Part 1 – The Plan
Let me start this by saying, this project was awhile in the
making. I’d read the blurbs in
multiple reloading guides about the 7 STW, and always thought it interesting,
if a bit impractical. The real spark to
get moving on this was when Nosler announced a new long range Accubond with
some really high BC options.
Here’s the chart they released:
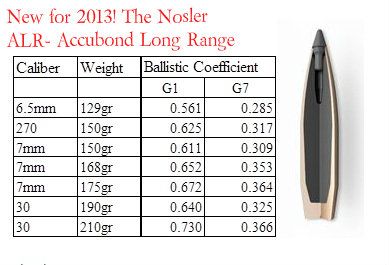
Looking for a new reloading project, this started to feel like it could have some real potential as a very long range round… .652 BC with a possible velocity in the
3100fps range? Sign me up!
That’s a better
BC than the 162g AMAX.
What sealed the deal was one of those random searches on gunbroker.com
that turned up one of the factory runs of Remington 700 SPSs in 7 STW at a great price. A few clicks and a phone call later, I had
one headed my way from the good folks at Gitguns. (http://www.gitguns.com)
Like many of you, I can’t leave well
enough alone. The real fun seems to
always start with the bolt on that turn a decent factory rifle into something a
bit better.
First, the factory SPS stock is, in my opinion, a flimsy
chunk of crap. That’s the kind, my
saintly mother-in-law might actually read this post, edited version. It had to go.
I’ve had two rifles with the factory Remington X-Mark Pro
trigger, so I had some pretty low expectations of it as well. I figured I’d go with the easy, always
reliable choice, of picking up a Timney.
Besides liking to support a local company, they have worked extremely
well three 700s I’ve used them on.
The only decision left at this point was glass.
A few other projects had eaten into my toy
budget, so I figured I’d just repurpose a spare Trijicon Accupoint 3-9 I had
sitting around. It’s a good piece of
glass, maybe not my first choice for a long range rifle, but certainly a good enough
option to get started.
As a side note,
to anyone mounting this scope on a long action… go with the medium height
rings. My personal preference is to go
for as low of a mount as possible, but the low height 1” rings, won’t clear the
power adjustment ring.
A call to Red Hawk Rifles out of Colorado, covered the
rings, trigger and stock parts I was going to need. (http://www.redhawkrifles.com/) They have become my Remington aftermarket parts vendor of
choice. They have some of the best
prices on B&C stocks, Talley rings and Timney triggers I’ve found.
Now I just had to sit back and wait for everything to show
up… you know, the hard part…
Next up - The build
Subscribe to:
Posts (Atom)